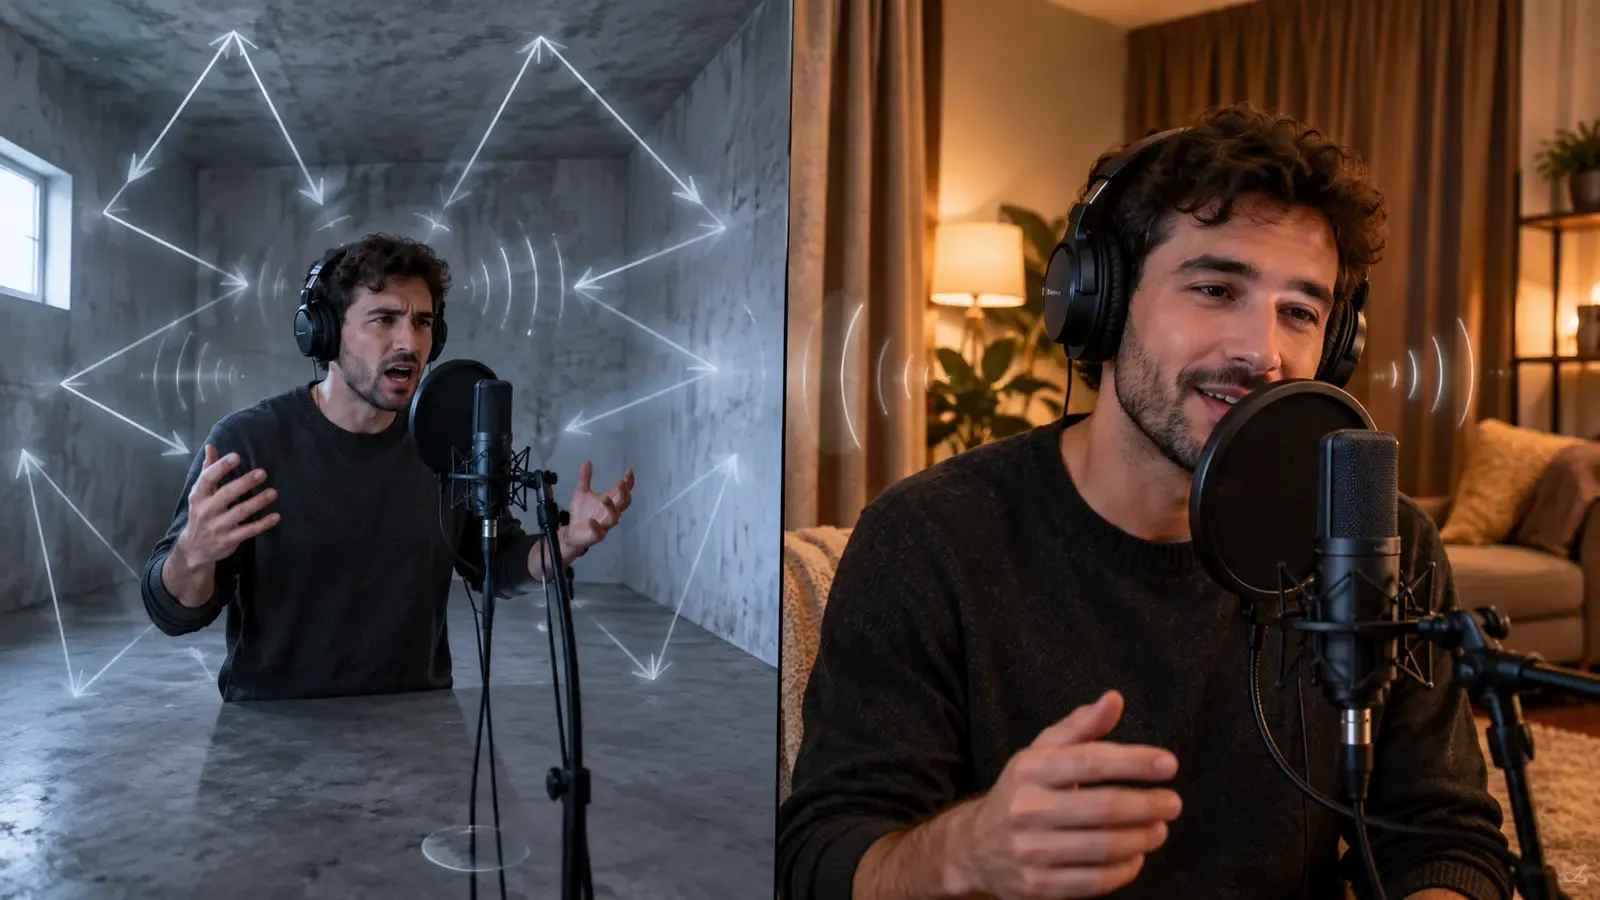
Hollow voice audio is usually not a microphone-price problem. The microphone hears the direct voice, then collects delayed reflections from walls, ceiling, floor and hard furniture. Move it farther away and the room becomes a larger part of the recording. Add aggressive processing later and the voice may turn metallic without losing the sense of distance.
The fastest improvement is often physical: shorten the path from mouth to microphone, aim the microphone correctly, move away from reflective boundaries and place useful absorption where the voice is actually traveling. This guide keeps the tests simple and emphasizes safe, stable setups rather than covering a room with improvised hazards.
Identify echo, noise or tone
Listen for repeated room reflections rather than calling every unpleasant sound “noise.” That sounds simple until a real deadline compresses the choices. The practical move is to decide what the viewer must notice, what the creator must preserve, and what can safely vary. Write those three things beside the project before changing tools or adding polish. A visible decision is easier to review than an instinct remembered after publishing.
Compare spoken pauses to hear fans, traffic and electronic hiss separately. Test the idea on the roughest useful version, not on a finished piece that is expensive to change. Watch it once as a viewer and once as an editor. During the viewer pass, note confusion without stopping. During the editor pass, trace each confusing moment back to a shot, sentence, transition or missing piece of evidence.
Check whether the voice is merely thin because the microphone is off-axis or too far away. There is a trade-off here. Consistency reduces effort and helps recognition, but too much consistency can hide weak thinking. Keep the part that carries meaning stable; vary the part that merely expresses it. This gives the workflow a backbone without turning every post into a duplicate of the last one.
Improve the direct-to-room balance
Move the microphone closer while leaving comfortable space for speech and breath. A common failure is to optimize the visible symptom while leaving the cause untouched. Before acting, name the audience, the job they are trying to complete and the proof they receive. If those three elements do not agree, a more attractive edit may improve appearance while making the communication less honest.
Lower input gain as the voice becomes stronger to avoid clipping. Treat the result as evidence rather than a personal grade. Record what changed, the conditions around the change and what you expected to happen. That note lets you compare similar projects later without inventing a story around one unusually strong or weak result.
Use a pop filter and slight angle when plosives become the new problem. The checkpoint should be quick enough to survive ordinary production. If it requires a perfect studio, a large team or an hour of analysis for every post, it will disappear when work gets busy. Reduce it to a repeatable question, a visible artifact and a clear pass condition.
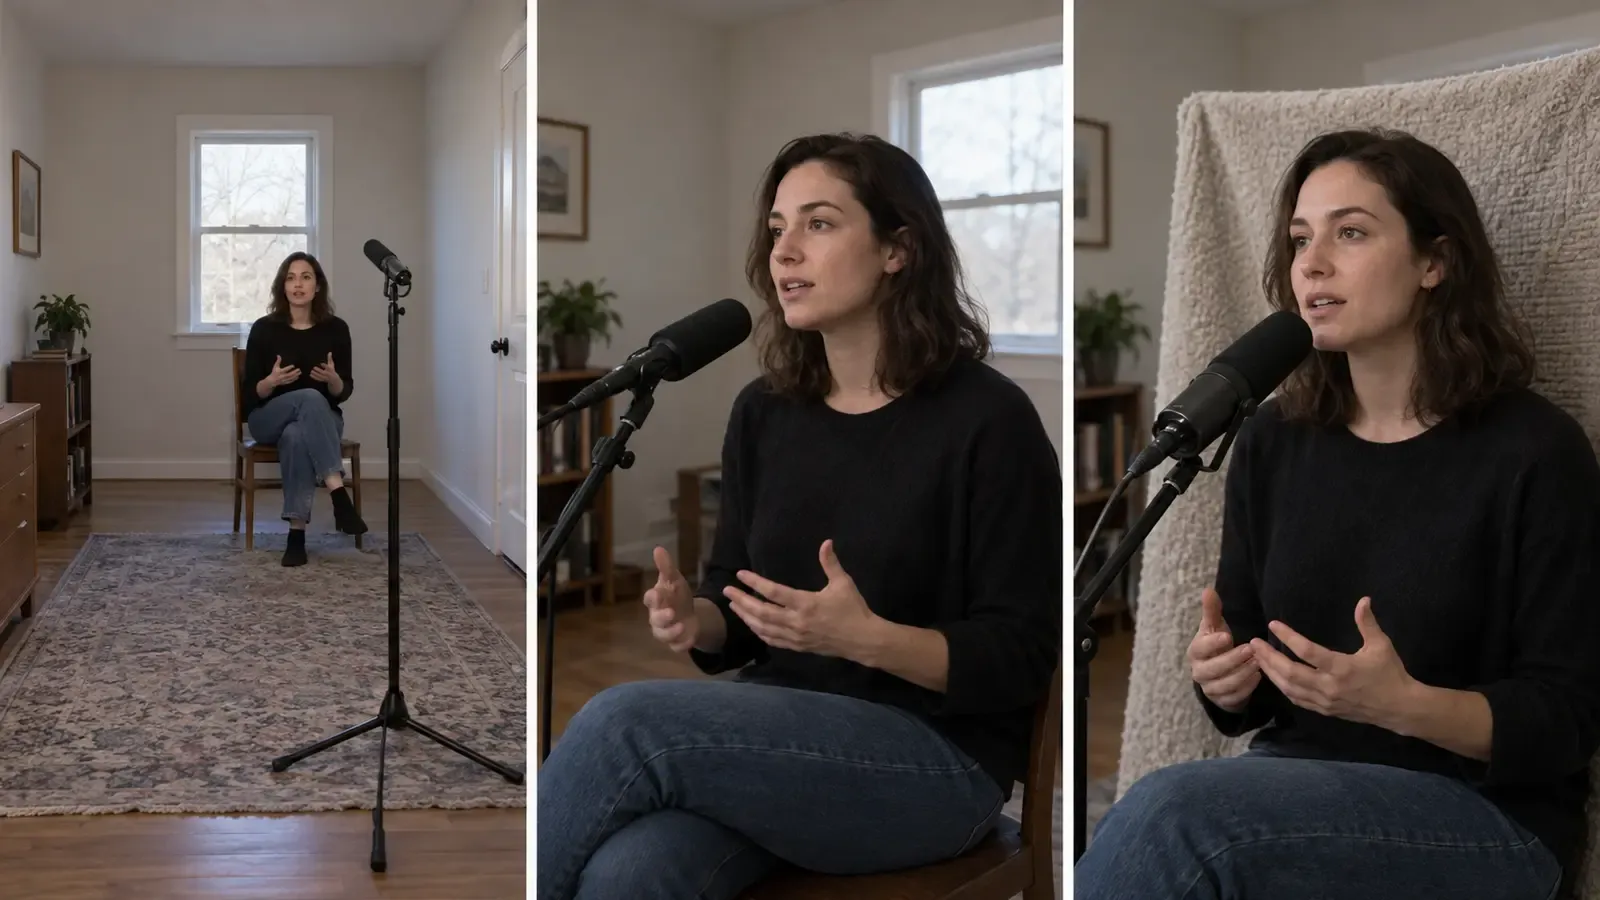
Aim the correct side of the microphone
Confirm whether the microphone is front-address, side-address or end-address. Ask a second person to explain what they think the piece promises before you tell them your intention. Their wording is useful even when you disagree. It reveals what the material communicates without the creator's private context, which is exactly the gap that viewers face.
Point its rejection area toward a computer fan or other steady noise when practical. That sounds simple until a real deadline compresses the choices. The practical move is to decide what the viewer must notice, what the creator must preserve, and what can safely vary. Write those three things beside the project before changing tools or adding polish. A visible decision is easier to review than an instinct remembered after publishing.
Keep position repeatable with a stable stand instead of holding the microphone. Test the idea on the roughest useful version, not on a finished piece that is expensive to change. Watch it once as a viewer and once as an editor. During the viewer pass, note confusion without stopping. During the editor pass, trace each confusing moment back to a shot, sentence, transition or missing piece of evidence.
Choose a better place in the room
Move away from the exact center and from large bare parallel surfaces. There is a trade-off here. Consistency reduces effort and helps recognition, but too much consistency can hide weak thinking. Keep the part that carries meaning stable; vary the part that merely expresses it. This gives the workflow a backbone without turning every post into a duplicate of the last one.
Avoid placing the speaker directly against a reflective wall. A common failure is to optimize the visible symptom while leaving the cause untouched. Before acting, name the audience, the job they are trying to complete and the proof they receive. If those three elements do not agree, a more attractive edit may improve appearance while making the communication less honest.
Test a furnished corner or curtained area while watching for boomy low frequencies. Treat the result as evidence rather than a personal grade. Record what changed, the conditions around the change and what you expected to happen. That note lets you compare similar projects later without inventing a story around one unusually strong or weak result.
Add targeted absorption safely
Place thick soft material behind or beside the speaker where early reflections originate. The checkpoint should be quick enough to survive ordinary production. If it requires a perfect studio, a large team or an hour of analysis for every post, it will disappear when work gets busy. Reduce it to a repeatable question, a visible artifact and a clear pass condition.
Use curtains, rugs, bedding or purpose-built panels without blocking ventilation or exits. Ask a second person to explain what they think the piece promises before you tell them your intention. Their wording is useful even when you disagree. It reveals what the material communicates without the creator's private context, which is exactly the gap that viewers face.
Treat the nearest strong reflections before decorating every visible surface. That sounds simple until a real deadline compresses the choices. The practical move is to decide what the viewer must notice, what the creator must preserve, and what can safely vary. Write those three things beside the project before changing tools or adding polish. A visible decision is easier to review than an instinct remembered after publishing.
Record a controlled test
Speak the same script at the same level for each microphone and room position. Test the idea on the roughest useful version, not on a finished piece that is expensive to change. Watch it once as a viewer and once as an editor. During the viewer pass, note confusion without stopping. During the editor pass, trace each confusing moment back to a shot, sentence, transition or missing piece of evidence.
Label files immediately so memory does not decide which setup sounded better. There is a trade-off here. Consistency reduces effort and helps recognition, but too much consistency can hide weak thinking. Keep the part that carries meaning stable; vary the part that merely expresses it. This gives the workflow a backbone without turning every post into a duplicate of the last one.
Monitor through headphones and compare at matched playback loudness. A common failure is to optimize the visible symptom while leaving the cause untouched. Before acting, name the audience, the job they are trying to complete and the proof they receive. If those three elements do not agree, a more attractive edit may improve appearance while making the communication less honest.
| Check | What to inspect |
|---|---|
| 1 | Speak the same script at the same level for each microphone and room position. |
| 2 | Label files immediately so memory does not decide which setup sounded better. |
| 3 | Monitor through headphones and compare at matched playback loudness. |
Use software after the room improves
Apply gentle high-pass filtering, equalization or de-reverberation only to a clean test copy. Treat the result as evidence rather than a personal grade. Record what changed, the conditions around the change and what you expected to happen. That note lets you compare similar projects later without inventing a story around one unusually strong or weak result.
Listen for watery tails, pumping and consonants damaged by aggressive settings. The checkpoint should be quick enough to survive ordinary production. If it requires a perfect studio, a large team or an hour of analysis for every post, it will disappear when work gets busy. Reduce it to a repeatable question, a visible artifact and a clear pass condition.
Prefer a modest natural result over a processed voice that sounds detached from the speaker. Ask a second person to explain what they think the piece promises before you tell them your intention. Their wording is useful even when you disagree. It reveals what the material communicates without the creator's private context, which is exactly the gap that viewers face.
Troubleshoot stubborn cases
If the room remains loud, shorten microphone distance again or change location. That sounds simple until a real deadline compresses the choices. The practical move is to decide what the viewer must notice, what the creator must preserve, and what can safely vary. Write those three things beside the project before changing tools or adding polish. A visible decision is easier to review than an instinct remembered after publishing.
If the voice becomes boomy, adjust proximity and corner placement before carving frequencies. Test the idea on the roughest useful version, not on a finished piece that is expensive to change. Watch it once as a viewer and once as an editor. During the viewer pass, note confusion without stopping. During the editor pass, trace each confusing moment back to a shot, sentence, transition or missing piece of evidence.
If sync drifts, investigate recording clocks and frame workflow rather than treating it as echo. There is a trade-off here. Consistency reduces effort and helps recognition, but too much consistency can hide weak thinking. Keep the part that carries meaning stable; vary the part that merely expresses it. This gives the workflow a backbone without turning every post into a duplicate of the last one.
Illustrative case study: the bedroom voiceover that sounded like a hallway
A course creator records at a desk with a side-address condenser microphone nearly a meter away. The room has a hard floor, bare wall and window behind the speaker. The waveform looks healthy, but consonants smear and every pause reveals a short room tail. A noise-removal preset reduces the fan while making the voice brittle.
She moves the microphone to a stable arm about a hand-span from her mouth, angles it slightly away from direct breath and lowers the gain. A thick curtain closes behind her, and a folded duvet is secured safely behind the microphone side of the setup without covering equipment or exits. She records the same paragraph after each change.
The matched tests make the improvement obvious without invented decibel claims. Software now needs only mild cleanup. The lesson is not that every bedroom needs a duvet; it is that microphone distance and early reflections should be diagnosed before a plug-in is asked to reconstruct the voice.
Keep a working record
A lightweight record makes this process teachable. Save the brief, first draft, decisive changes, permissions or source notes, final export and one paragraph about the outcome. For creators recording voiceovers, tutorials or interviews in reflective bedrooms and home offices, that record is more valuable than a folder full of unnamed versions because it shows why a choice was made.
Keep rejected options too, especially when they looked attractive but weakened the audience promise, exceeded the budget or created a rights problem. A short reason is enough. Over several projects, these notes reveal recurring friction and help separate a workflow problem from a one-off production accident.
Review the record after the agreed observation window. Mark what you know, what remains uncertain and what deserves another test. Do not rewrite the original hypothesis to make the outcome seem predictable. Honest notes protect the usefulness of both successful and disappointing work.
Choose the next useful step
Apply the framework to one active project before expanding it into a larger system. The first pass should expose a concrete decision, not create more administration. Read MP4, WebM, MOV and Codecs: A Creator’s Export Decision Guide. Read Shoot B-Roll Alone With a Six-Shot Coverage System. Browse the AnyVid.io blog for related creator education. When reference media is involved, use only media you created, own, or have permission or another lawful right to save.
Frequently asked questions
Is hollow audio the same as background noise?
No. Hollow or echoey sound usually involves reflected versions of the voice arriving after the direct sound. Background noise includes fans, traffic or hiss. The problems can coexist, but they require different tests and fixes.
How close should I speak to the microphone?
There is no single distance for every microphone, voice and performance. Start close enough that the direct voice clearly dominates the room, use a pop filter where needed, set gain to avoid clipping and make short labeled tests.
Will acoustic foam fix the room?
Thin foam may reduce some high-frequency reflections, but it is not a universal soundproofing solution and may do little for lower frequencies. Placement, thickness, air gaps and room geometry matter. Start with microphone distance and controlled tests.
Can AI remove room echo completely?
Software can reduce some reverberation, but aggressive processing may create metallic or watery artifacts and damage speech. Improve the recording conditions first, then use processing conservatively on a copy while checking the full voice.
Why does my voice get boomy when I move closer?
Directional microphones can emphasize low frequencies at close distances, and corners or walls can add bass buildup. Adjust distance, angle and room position, then reset gain. Do not solve every boom with extreme equalization before checking placement.
Was this article helpful?
Tell us what worked so we can improve future content.